COGZ Report Writer
COGZ Maintenance Management Software Optional Report Writer is used to create customized reports.
Report Writer Table of Contents
The Browse Reports Layouts Window
The Report Writer Browse Reports Layouts Window lets you browse the currently available reports.
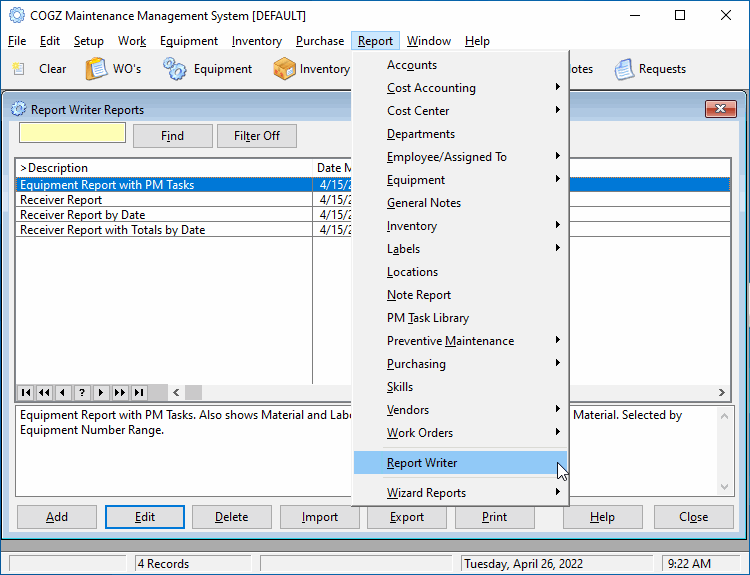
The Browse Window displays the date and time at which the report was last modified as well as the Report Description.
Add: Provides access to create a new report
Edit: Allows editing of an existing report.
Delete: Select the report to be deleted and click this button to remove from list.
Import: Allows Importing a Report from an exported file.
Export: Allows Exporting a Report to a file for later importing. To use as the basis for a new report, Save the Export, then Import using the Rename option.
Print: :Prints the Selected Report
Close: Closes Report Writer and Returns to COGZ window.
Edit Report Form
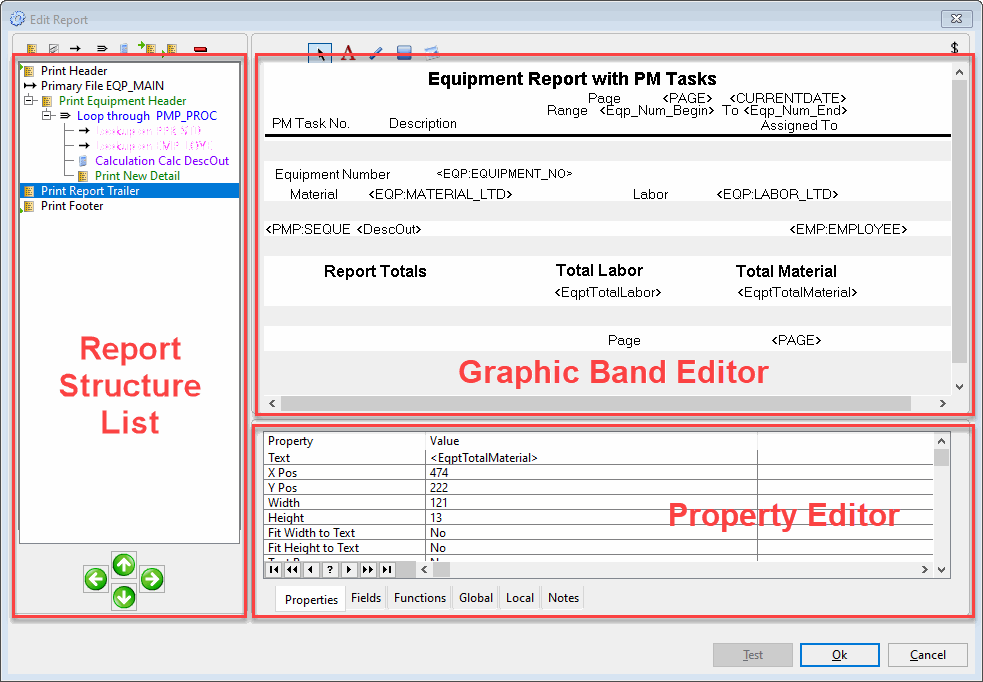
The Edit Report Form allows you to create and edit graphic reports with ease. There are three sections to this window:
The Report Structure List on the left
The Graphic Band Editor on the top right
The Property Editor on the bottom right
The Report Structure List
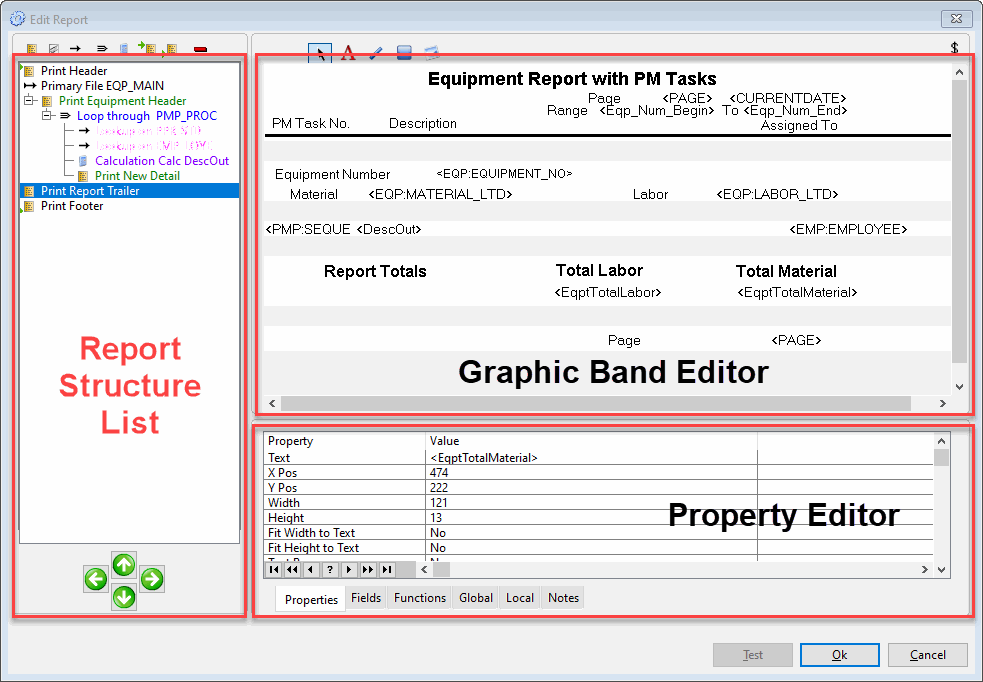
The Report Structure List allows you to specify a Primary Source, and add graphic report Details, Lookups, Secondary Source loops, Calculations, Headers and Footers to your report. A short description for each of these is given below.
Note that you can move each item up or down depending on where on the report it should happen. You can also move each item left or right. If an item A is left of any item B above it, it means that that item B is a parent of item A.
Primary File: This specifies the Primary Source for the report. Note that you must Close the Edit window and re-open for the new table’s fields included in the editor.
Detail: Click to add Detail Band to Report
Lookup: If the current file has a many-to-one relation with another file, this can be used to look up the related record in that related file (by current file we mean the file of the closest parent that is either a Primary Source or Secondary Loop).
Secondary Loop: If the current file has a one-to-many relation with another file, this can be used to loop through the related records in the related file.
Calculation: Use this to perform a calculation and set a variable.
Header: This is the header band for the report. There can be only one.
Footer: This is the footer band for the report. There can be only one.
Remove: Click to Remove Highlighted Band
The Graphic Band Editor
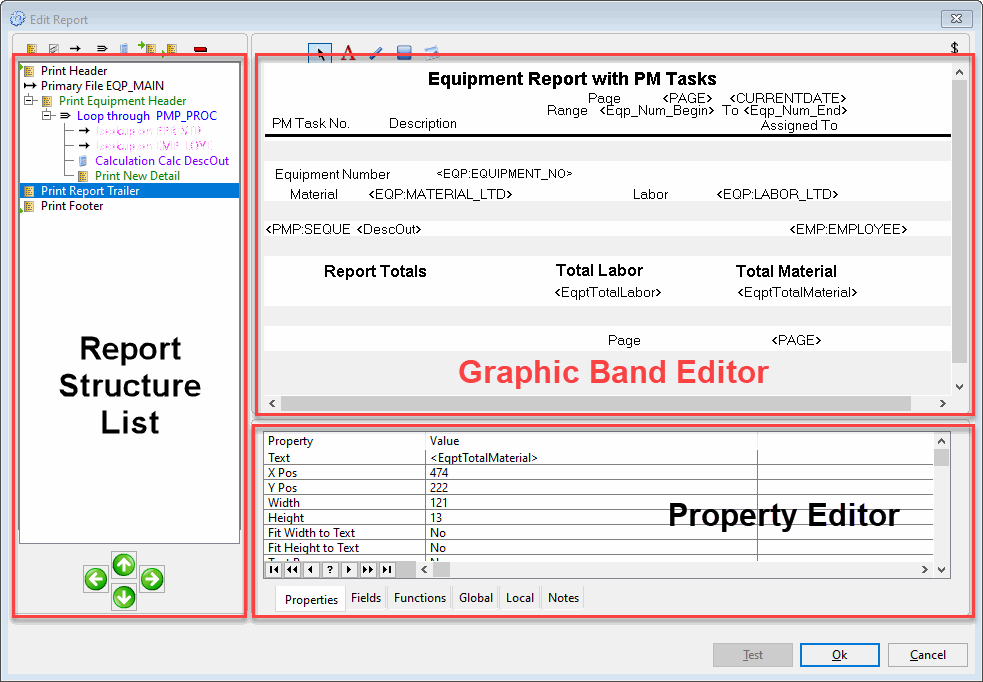
Any detail, header or footer created using the Report Structure List above appears in this editor. Here you will find the editing functionality available to you:
Use the provided buttons to add boxes, strings, images and lines to any of the bands.
Resize the bands and controls on the bands.
Right-click and observe the popup menu allowing you to do things like align controls and copy-paste. Holding down the Control Key allows you to select multiple controls at once.
A note on Strings: Putting angular brackets around a word indicates to the report printing engine that this is possibly a local or global variable (see the Property Editor), or a field in one of your report tables. See the Printing Variable and Field Values section for more details.
The Property Editor
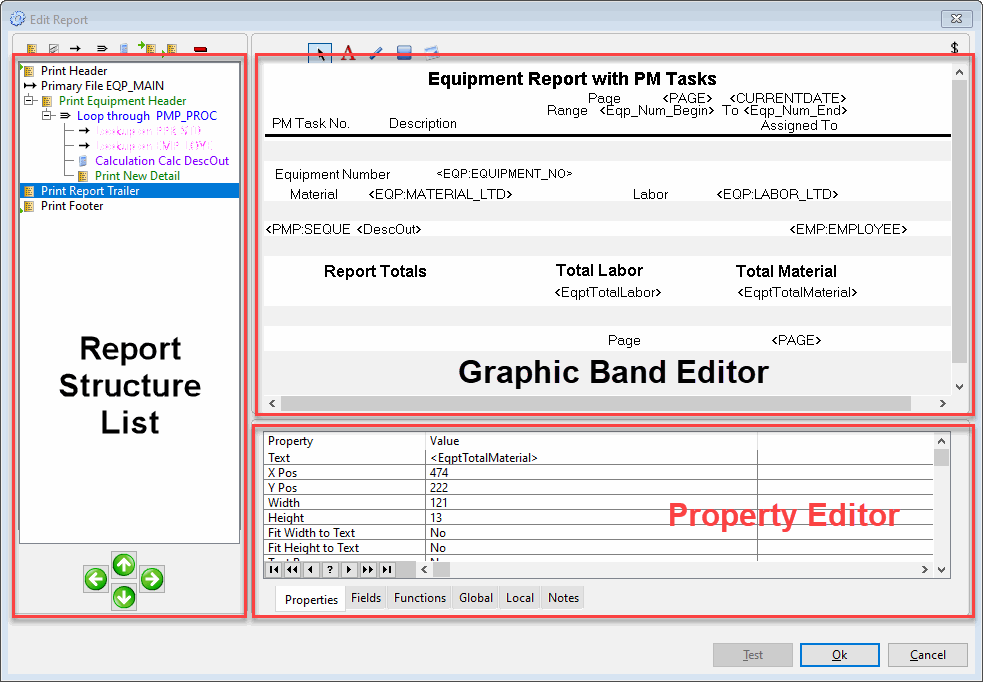
This feature allows you to edit various properties belonging to the currently selected item in the Report Structure List. If a control is selected in the Graphic Band Editor, it allows you to edit the properties for that control. The property editor has several tabs:
The Properties Tab: On this tab you can edit various properties for the selected item or control, including the text value, colors and position.
The Totaling Tab: You can create totals that are automatically calculated through the loop for the specified field.
Note: The field has to be present somewhere on a band that has the loop as parent for the total to be calculated correctly.
The Fields Tab: This displays all the tables that are used in this report, with their fields and descriptions.
The Functions Tab: This displays the functions available.
The Global Tab: This is a list of global variables available to the user for use in the report. The user can edit, add and remove these at will. They are global in the sense that they are available to all reports in this program (see the next step for more on this).
The Local Tab: Similar to the Global Tab, except that these variables are only available to the current report in the program.
The Notes Tab: Write any general notes regarding the report here.
The Print Window
When you have finished editing the report, you can press OK to save it and then click Print on the Browse Reports window. This brings up the Report Options window:
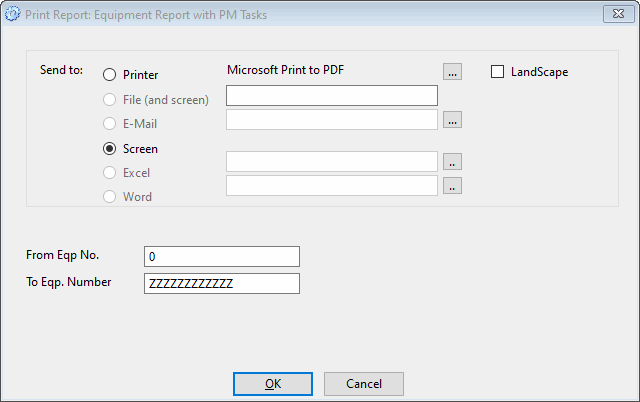
Here you can select where you want to print the file to, choose your printer, etc. Any local or global report variables which were declared of type User will appear on this window, allowing the user to specify their values.
You will also notice a Primary Sort drop down box appearing in some cases. This happens when for the Primary Source of that report, the user specified User Selects for the sort order.
Clicking start sends the printing on its way.
Properties on the Properties Tab
The Properties Tab on the Property Editor allows you to edit any of the properties relating to the currently selected item in the Report Structure List in edit-in-place type fashion. If a control on a band is selected, its properties will appear in the Property Editor for editing. Below we list the properties for each different type of item along with descriptions for each.
A Note on Parent Files
The parent file of an item is assumed to be the main file of the closest Secondary Loop or Primary Source item above it. It is also possible to override the parent file of a given Secondary Loop or Lookup by changing the Parent File entry on the Properties Tab.
Primary Sources
This item contains properties relating to the Primary Source of the report, as well as other general items.
Description: A description for the report. This description is what appears in the Browse Window.
Primary Source: The name of the Primary Source through which this report will loop.
Order By: Choose a key for the Primary Source by which it should ordered.
Range _ From: There may appear a number of these prompts, depending on the key relating this Source to its parent files. If there are fields other than fields linking this Source to its parent file in the relating key, there will appear such a prompt for each of these fields. Fill in the range from value for this field, if desired.
Range _ To: There may appear a number of these prompts, depending on the key relating this Source to its parent files. If there are fields other than fields linking this Source to its parent file in the relating key, there will appear such a prompt for each of these fields. Fill in the range to value for this field, if desired.
Archive: To be updated.
Order Fields: To be updated.
Report Filter: Enter a report filter here for the Primary Source, if desired. This will be evaluated for every record fetched. You can include report variables in this expression.
Server Filter: Not Used.
Server Order: Not Used.
SQL Filter: Not Used.
SQL Order: Not Used.
Format: Choose the format of the report. Options are Text, PDF, HTML, Excel, and XML. Some of these are To be updated.
Graphic: Choose between Graphic and Text reports. This defaults to Graphic.
Chain To: If you want another report to start printing immediately after this one has been printed, put the report number here.
Report Number: The report number of this report. This field is not editable.
Send To: Choose where you would like the report to printed to by default. Choose between Printer, File and Screen.
Destination: Choose the printer you would like this report to be sent to by default.
Landscape: Choose whether you want the report to be printed in landscape form by default.
Report Type: The user can use this at his or her discretion. Useful for grouping different types of reports together.
Secondary Loops
Parent File: If you would like this to have a different parent file than the default, choose it here. See the section on Secondary Loops and the Note on Parent Files to see what a parent file is.
File Name: The name of the Secondary Source to loop through. Only files related to this item’s parent file in a many to one relationship will appear in this dropdown.
Cache: To be updated.
Filter: A report filter for this Secondary Source. This will be evaluated for every record fetched. You can include report variables in this expression.
Server Filter: Not Used.
Server Order: Not Used.
SQL Filter: Not Used.
SQL Order: Not Used.
Range _ From: There may appear a number of these prompts, depending on the key relating this Secondary Source to its parent files. If there are fields other than fields linking this Secondary Source to its parent file in the relating key, there will appear such a prompt for each of these fields. Fill in the range from value for this field, if desired.
Range _ To: There may appear a number of these prompts, depending on the key relating this Secondary Source to its parent files. If there are fields other than fields linking this Secondary Source to its parent file in the relating key, there will appear such a prompt for each of these fields. Fill in the range to value for this field, if desired.
Lookups
Parent Source: If you would like this to have a different parent file than the default, choose it here. See the section on Lookups and the Note on Parent Files to see what a parent file is.
Source Name: The name of the file to do the lookup on. Only files related to this item’s parent file in a one to many relationship will appear in this dropdown.
Cache: To be updated.
Linking Fields: This only appears if the Parent File is set to None. This allows you to do a lookup based on a custom relationship between files. What is required here is an expression that links up to three fields in the Lookup file to corresponding fields in the parent file. In other words, supposing the parent file is Invoice and the file to do the lookup on is Customers, it needs to have the following format:
CUS:CField1 = INV:IField1
or
CUS:CField1 = INV:IField1 and CUS:CField2 = INV:IField2
or
CUS:CField1 = INV:IField1 and CUS:CField2 = INV:IField2 and CUS:CField3 = INV:IField3
You also need to make sure that there is a key in the Lookup file that contains each of the lookup fields used in the expression. Otherwise, the lookup will not work.
Calculations
Calc Name: The name of the calculation. You may call it whatever you like.
If: A condition for the calculation. Set to 1 if no condition is required. If you are using any variables or table fields in this condition, they should be enclosed by angular brackets.
Set: The name of the variable to receive the result of the calculation. This variable will have to be declared either on the Global Tab or the Local Tab. You may write the variable names as in, although putting angular brackets around it wont hurt.
To: The calculation/expression you would like the variable above to be set to. Once again you may use table fields or variables, but remember to put angular brackets around them.
Else Set: The name of a variable to set if the condition fails. This variable will have to be declared either on the Global Tab or the Local Tab. You may write the variable names as in, although putting angular brackets around it wont hurt.
To: The value to set the Else Set variable above to. It can be an expression. Once again you may use table fields or variables, but remember to put angular brackets around them.
Details, Headers, Footers and Forms
Detail/Header/Footer Name: A descriptive name for this band.
Suppress If Block Empty: This is only valid for bands that appear between a Block Start and Block End statement. What this means is that this band should be printed only if other bands within the block that don’t have this option ticked have been printed. A Suppressed detail is indicated in the Report Structure List by putting a star next to it. See the section on Blocks in a Report for more info.
Block Start: This band is the start of a block. See the Suppress If Block Empty option above for more info. A Block Start is indicated in the Report Structure List by putting a closing angular bracket next to it. See the section on Blocks in a Report for more info.
Block End: This band is the end of a block. See the Suppress If Block Empty option above for more info. A Block End is indicated in the Report Structure List by putting an opening angular bracket next to it. See the section on Blocks in a Report for more info.
Hide: Don’t ever print this band. But do execute calculations and evaluations relating to this band.
Width: The width of this band on the report, in pixels.
Height: The height of this band on the report, in pixels.
Color: The background color of this band.
Condition: A condition under which this band should be printed. May be an expression. You may use table fields or variables, but remember to put angular brackets around them. Can be left blank.
Controls
Text: (String Controls Only) The text of the string control.
X Pos: The vertical position of the control on the band, in pixels.
Y Pos: The horizontal position of the control on the band, in pixels.
Width: The width of the control on the band, in pixels.
Height: The height of the control on the band, in pixels.
Fit Width: If this is set, Report Writer will adjust the size of the control to its contents when the report is printed, and the specified Width will be ignored. In particular, you can set this to ensure that a string control gets adjusted to the length of its contents when the report gets printed.
Fit Height: If this is set, Report Writer will adjust the size of the control to its contents when the report is printed, and the specified Height will be ignored.
Transparent: Whether the control should be transparent.
Background Color: The background color of the control. When editing this a color chooser pops up.
Foreground Color: The foreground color of the control. Only really useful for boxes and lines. When editing this a color chooser pops up.
Font Typeface: (String Controls Only) The font name for the string control. When editing this a font chooser pops up.
Font Style: (String Controls Only) The font style for the string control. When editing this a font chooser pops up.
Font Charset: (String Controls Only) The font name for the string control. When editing this a font chooser pops up.
Font Size: (String Controls Only) The font size for the string control. When editing this a font chooser pops up.
Font Color: (String Controls Only) The color for the string control. When editing this a font chooser pops up.
Stretched: (Image Controls Only) Whether the image should be stretched.
Centered: (Image Controls Only) Whether the image should be centered.
Tile: (Image Controls Only) Whether the image should be tiled.
File: (Image Controls Only) The file name for the image to display here. Note that the image file has to be in the application directory.
Line Width: (Line and Box Controls Only) The line width to use when drawing the line or box. In pixels.
Picture: (String Controls Only) A picture to use for displaying the string.
Justify: (String Controls Only) Choose whether you want the string to be left, right or center justified within in the control.
Fit to Width: When the report is printed, this string field will be made long enough to ensure that all the text (after fields values, etc. have been evaluated) is printed.
Fit to Height: Same as above, but for height.
Text Box: This is mainly for use with data source fields that are very long. You will not see the difference on the editor, but when this field is printed on the report, it will be printed as a text box.
RTF: In the case that Text Box above is on, this enables Rich Text Format. Again, you will not see the difference in the editor, only on the printed report. It is for use with dictionary file fields that have RTF enabled.
Blocks in a Report
A classical example of a Block in a report would be the following:
Suppose you had a secondary loop through Purchased Items for a report on Invoices. For each invoice, you want to print a header, the Purchased Items relating to that Invoice, and then the invoice footer. Naturally, if there are no Purchased Items relating to an Invoice, because they for example have been filtered out, you wouldn’t want that entire invoice to print. To achieve this, you would make the invoice header the Block Start and Suppress it, and the invoice footer the Block End and Suppress that too. The actual band with the Purchased Item info on it, however, should be left alone.
The effect that this will have is the following: If there is at least one record in the secondary loop that does not get filtered out and its associating detail prints, all the details within the block will print. However, if there are no valid records and hence no details for Purchased Items print, none of the other details (i.e. the invoice header and footer) will print either.
In your Report Structure List, this scenario would look something like the following:
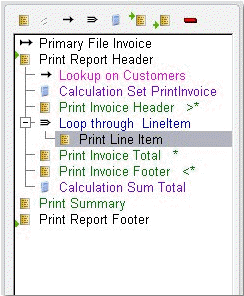
The stars represents bands with “Suppress if Block Empty” switched on, the closing angular bracket indicates a block start, and the opening angular bracket indicates a block end.
Functions and Variables in the Report
As was mentioned above in the section on the Property Editor, you can add variables to your report using the Global and Local tabs. Placing the name of this variable in angular brackets in a string on the report then causes the value of the variable to print out when the report is printed.
Note that there are three types of variables:
User: When the report is printed, the user will be prompted on the PrintReport screen for the values of these variables before printing starts. The value for the prompt should be entered in the Else Value field in the list. You can specify the initial value for this variable in the Value field. NOTE: Create a lookup for these user variables on the The_Control_template
Computed: These variables are computed either by Totalling (see Secondary Loops), Calculations, or they contain the values specified in the Value field in the list. The value in the Value field can be an expression, and can contain calls to functions available on the Functions Tab.
Conditional: Here you can specify a Condition, Value and Else Value
Built in Functions
| FunctionName | Description | Example |
| ABS | Returns the absolute value of a variable’s contents. | abs(<MyVariable>) |
| INT | Returns the integer value of a decimal | int(<MyDecimal>) |
| CHANGED | Returns if a variable has changed or not. NOTE: You must use quotes for the variable name to be checked. | changed(‘MyVariable’) |
| HEADER | Returns if a variable has changed or not (first instance is returned as a change). NOTE: You must use quotes for the variable name to be checked. | header(‘MyVariable’) |
| CHR | Returns the ASCII string character of the ASCII value passed (valid numbers are 0 -255). | chr(<MyNumber>) |
| CLIP | Returns a clipped variable (i.e. removes the trailing spaces in a string). | clip(<MyVariable>) |
| CLOCK | Returns the current time (in clarion time – i.e. hseconds after midnight). | clock() |
| TODAY | Returns the current date in clarion date (i.e. number of days after 1 Jan 1800 + 3). | today() |
| ALL | Returns a string of repeated characters, where the first parameter is the character, and the next is the number of repeats. | all(<MyCharvar>, <NoOfChars>) |
| RIGHT | Right justifies a string. | right(<MyVariable>) |
| CENTRE/CENTER | Centre justifies a string. | centre(<MyVariable>) |
| DAY | Return the day of month from a date. | day(<MyDateVar>) |
| MONTH | Returns the month from a date . | month(<MyDateVar>) |
| YEAR | Returns the year portion of a date. | year(<MyDateVar>) |
| LEFT | Left justifies a string. | left(<MyVariable>) |
| DOW | Returns the day of week (0 for Sunday through 6 for Saturday) | dow(<MyDateVar>) |
| DATE | Returns a clarion date from a passed month, day and year | date(<MyMonthVar>, <MyDayVar>, <MyYearVar>) |
| BEGINSWITH | Returns 1 if a string begins with a set of characters | beginswith(<MyStringVar>, <MyCharsVar>) |
| CONTAINS | Returns 1 if a string contains a set of characters | contains (<MyStringVar>, <MyCharsVar>) |
| ENDSWITH | Returns 1 if a string ends with a set of characters | endswith (<MyStringVar>, <MyCharsVar>) |
Printing Variable and Field Values
Putting angular brackets around a word indicates to the report printing engine that this is possibly a local or global variable (see the Property Editor), or a field in one of your report tables. When printing the report, RightReports will replace that part of the string with the current value of the variable, or with the value in the field of the current record in the table.
You can find all the local and global variables available to this report on the Local and Global tabs of the Property Editor. All the fields of the tables used in your report can be seen on the Fields Tab of the Property Editor. If your report is a Graphic report, you can drag and drop these fields onto any report band in the Graphic Band Editor above the field list.
Built-In Keywords
There are some built-in keywords such that if they are encountered in a string in angle brackets, the Report Writer will perform a certain action. The are essentially variables and are treated in exactly the same way. The following are examples:
<formfeed>: When the Report Writer runs into this, it immediately starts a new page. For text reports it starts a new page immediately and prints the remainder of the band its on on the next page. For graphic reports, it finishes printing the current band before starting a new page.
<page>: This will be replaced by the current page number.
<linenumber>: Only for text reports. This will be replaced by the current line number on the page.
Note – The MS Windows commands of Ctrl+Z for Undo and Ctrl+Y for Redo are available when needed.
Sample Report
Reviewing an existing report is perhaps the best way to get started with Report Writer.
When starting a new report, the only entry on the Report Structure List will be “Primary File”. Here is where you give the report a file name which will be displayed in the Browse Window. This is done through the Property Entries at the bottom of the Edit window. The primary table is also defined there.
Detail bands, Lookups, Header and Footer are subsequently added as needed. A simple report with a single sub-loop is shown below.
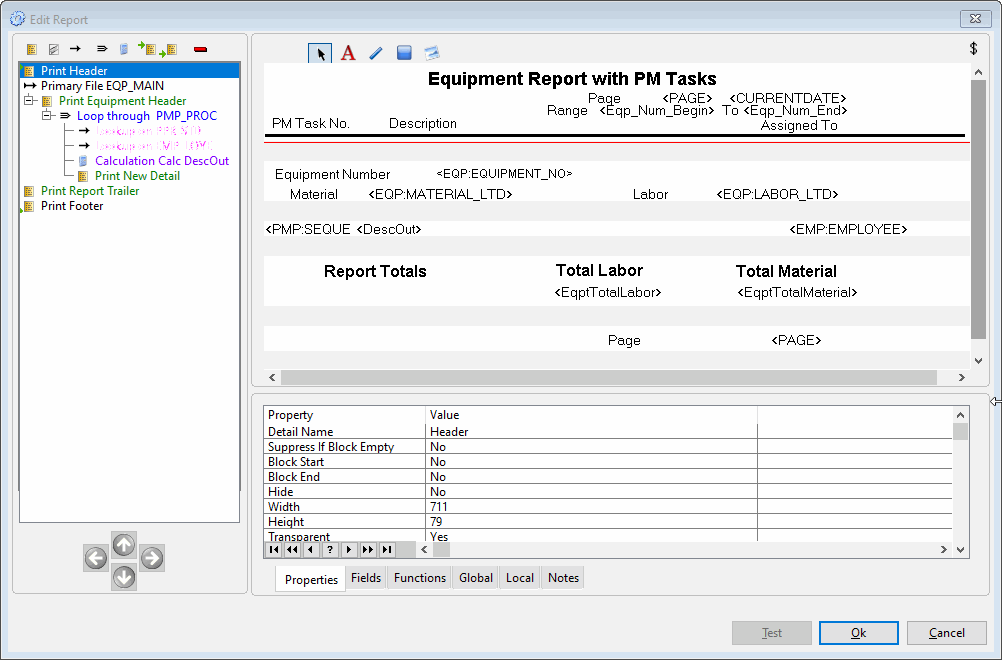
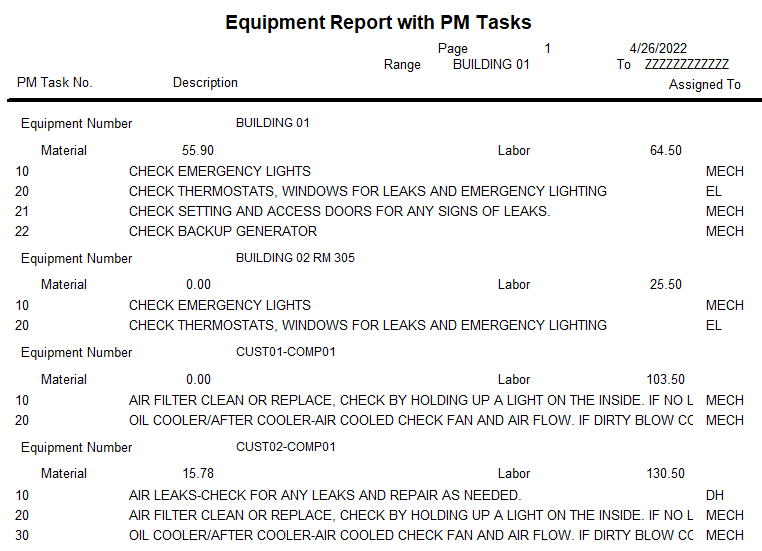
The Report Structure shown produces the report below:
